OMMMMMGGGGGG SORRY I'VE BEEN ABSENT FOR LIKE, FOREVER!!!
Hi Diyers,
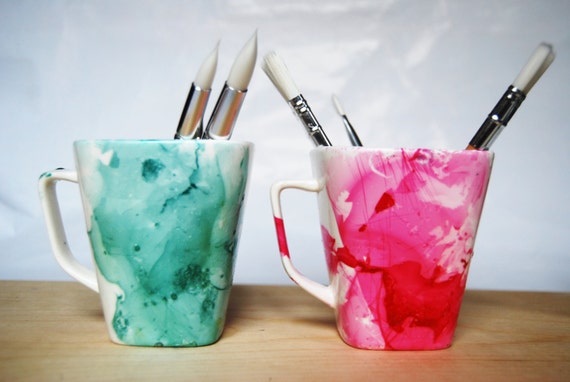
Today's DIY is DIY is a really cute mug with a design made of nail polish! It's basically like doing watermarble nail art, except you don't paint your nails; you paint the cup!
What You'll Need:
- Nail Polishes of your choice (However you need a LOT of nail polish!)
- Big tub/box that can hold water!
- A white mug
- A toothpick
- Water
- Top coat
- Base coat
- Paint brush
- Tape (Optional)
Steps:
1. Before doing anything, fully wash your mug.
2. Using the paintbrush, paint whatever spot you will be marbling with the base coat. (Optional: I recommend covering the mug with tape before you do this, so that you know exactly where the base coat is, and so that the design (later in the tutorial) doesn't get on places on the mug where you don't want it to be.)
3. While drying, fill the big tub/box 3/4 of water.
4. Drop several drops of nail polish on the surface of the water. This needs to be somewhat new nail polish; you'll know if it's old if the polish sinks to the bottom, and does not stay on the surface of the water.
5. Quickly use a toothpick and make designs. They can be abstract, and look like you actually painted the cup. Or, it can be the original water marble nail art designs.
6. Quickly dip the part of the mug you are water marbling, and hold for 10 seconds.
7. Use the toothpick to gather the excess nail polish still on the surface of the water.
8. Take the mug out of the water!
9. You can now take off the tape if you chose to put it on the mug in step 2.
10. Using a clean paintbrush, paint a top coat over your design.
11. Let dry for 2 hours
You are now done! I hope you DIYers liked this DIY, and will even try it out! If you use the mug for drinking liquids, I recommend NOT putting this mug in the dishwasher, but hand washing it very gently. This is just so the nail polish won't come off! However, what I would do is put it on your text, and put pencils or pens in it. It would be so cute, and so tumblr-y!
Anyways, I hope to see you soon for my next DIY!
~ DIY With Madi
Hi Diyers,
Today's DIY is DIY is a really cute mug with a design made of nail polish! It's basically like doing watermarble nail art, except you don't paint your nails; you paint the cup!
What You'll Need:
- Nail Polishes of your choice (However you need a LOT of nail polish!)
- Big tub/box that can hold water!
- A white mug
- A toothpick
- Water
- Top coat
- Base coat
- Paint brush
- Tape (Optional)
Steps:
1. Before doing anything, fully wash your mug.
2. Using the paintbrush, paint whatever spot you will be marbling with the base coat. (Optional: I recommend covering the mug with tape before you do this, so that you know exactly where the base coat is, and so that the design (later in the tutorial) doesn't get on places on the mug where you don't want it to be.)
3. While drying, fill the big tub/box 3/4 of water.
4. Drop several drops of nail polish on the surface of the water. This needs to be somewhat new nail polish; you'll know if it's old if the polish sinks to the bottom, and does not stay on the surface of the water.
5. Quickly use a toothpick and make designs. They can be abstract, and look like you actually painted the cup. Or, it can be the original water marble nail art designs.
6. Quickly dip the part of the mug you are water marbling, and hold for 10 seconds.
7. Use the toothpick to gather the excess nail polish still on the surface of the water.
8. Take the mug out of the water!
9. You can now take off the tape if you chose to put it on the mug in step 2.
10. Using a clean paintbrush, paint a top coat over your design.
11. Let dry for 2 hours
You are now done! I hope you DIYers liked this DIY, and will even try it out! If you use the mug for drinking liquids, I recommend NOT putting this mug in the dishwasher, but hand washing it very gently. This is just so the nail polish won't come off! However, what I would do is put it on your text, and put pencils or pens in it. It would be so cute, and so tumblr-y!
Anyways, I hope to see you soon for my next DIY!
~ DIY With Madi