Happy December everyone! Today's DIY is how to make these super cute and decorative 3D Paper Snowflakes! These are perfect for the holidays because they're not religious! Plus, they don't necessarily need to be for the holidays- they can just be a yearly thing!

What you'll need:
-2 pieces of regular sized sheets of paper
-A printer
-Scissors
-Tape
-Hole Puncher
-String
Instructions:
1. Print out this PDF File twice (It makes the whole process a LOT easier than doing it without a template...)
2. Use your scissors and cut out the squares. We only need six of the squares to make one snowflake, so you can discard the extra two, or save them for another snowflake.
3. Fold each square diagonally.
4. Cut on the lines of each diagonally-folded square piece of paper.
5. Unfold everything. It should look like this:
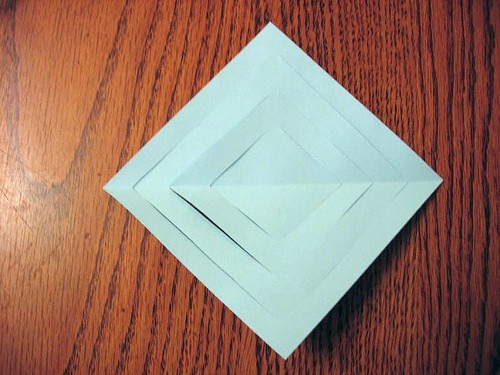
6. Fold the inner cuts and tape it like this:

7. Turn the paper over and tape the second set of cuts together like so:

8. Turn the paper over again and tape it until there isn't anything left to tape.

9. Do this with all 6 pieces of paper squares
10. Tape or staple all of them together in the middle like so:

11. Hole punch the top of any snowflake piece and put some string in it so you can hang it up!
You are done! I know this was kind of difficult... it was difficult for me to think of the steps and write them down so they were understandable! This post isn't sponsored, but I think the person who took the last few photos should get credit: Check this person's website out by clicking this circle -> •
~Madi
What you'll need:
-2 pieces of regular sized sheets of paper
-A printer
-Scissors
-Tape
-Hole Puncher
-String
Instructions:
1. Print out this PDF File twice (It makes the whole process a LOT easier than doing it without a template...)
2. Use your scissors and cut out the squares. We only need six of the squares to make one snowflake, so you can discard the extra two, or save them for another snowflake.
3. Fold each square diagonally.
4. Cut on the lines of each diagonally-folded square piece of paper.
5. Unfold everything. It should look like this:
6. Fold the inner cuts and tape it like this:
7. Turn the paper over and tape the second set of cuts together like so:
8. Turn the paper over again and tape it until there isn't anything left to tape.
9. Do this with all 6 pieces of paper squares
10. Tape or staple all of them together in the middle like so:
11. Hole punch the top of any snowflake piece and put some string in it so you can hang it up!
You are done! I know this was kind of difficult... it was difficult for me to think of the steps and write them down so they were understandable! This post isn't sponsored, but I think the person who took the last few photos should get credit: Check this person's website out by clicking this circle -> •
~Madi