Hey DIYers! It's finally summer, which means we are going start drinking cold, yummy drinks. But isn't it annoying when bees start buzzing around your cup, taunting you? Today's DIY will help solve that. It's DIY Drink Covers! These are sooo cute, so lets get started!
You will need:
- Perler beads
- Circle pegboard
- Ironing paper
- Iron
Steps:
1. Heat up your iron on a low setting.
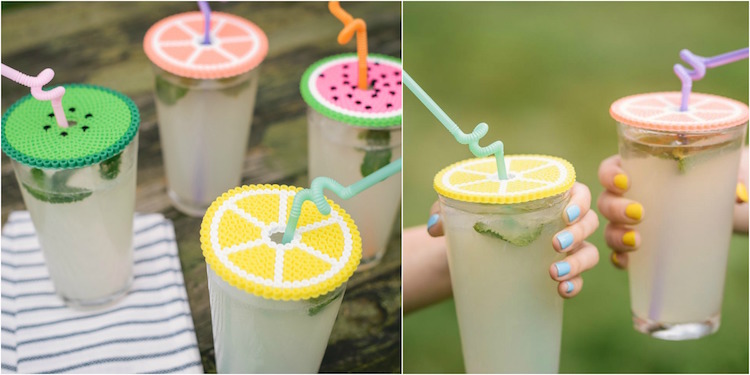
2. On the perler pegboard, use the perler beads and make a design. I suggest fruit designs, like the ones shown in the picture below! Kiwi's, grapefruits, lemon, orange, watermelon, etc. are all so cute!
3. Take some of the beads out of the center of your design. This will the hole for the straw.
4. Carefully put the ironing paper on the design.
5. Place the iron over the ironing paper that is over the design and irom until you can see the entire design through the paper. This shows you that the beads have fused together. Do not iron them too much though or the beads will melt.
6. Carefully lift the design off the pegboard, and flip the design over.
7. Put the ironing paper on top of the other side.
8. Repeat step 5.
9. Let cool
10. You're done!!
To use the drink covers, put the straw through the hole and let the drink covers cover your glass.
I hope you enjoyed this DIY tutorial for DIY Drink Covers! Stay tuned for more DIYs coming soon! -Madi from DIY With Madi
You will need:
- Perler beads
- Circle pegboard
- Ironing paper
- Iron
Steps:
1. Heat up your iron on a low setting.
2. On the perler pegboard, use the perler beads and make a design. I suggest fruit designs, like the ones shown in the picture below! Kiwi's, grapefruits, lemon, orange, watermelon, etc. are all so cute!
3. Take some of the beads out of the center of your design. This will the hole for the straw.
4. Carefully put the ironing paper on the design.
5. Place the iron over the ironing paper that is over the design and irom until you can see the entire design through the paper. This shows you that the beads have fused together. Do not iron them too much though or the beads will melt.
6. Carefully lift the design off the pegboard, and flip the design over.
7. Put the ironing paper on top of the other side.
8. Repeat step 5.
9. Let cool
10. You're done!!
To use the drink covers, put the straw through the hole and let the drink covers cover your glass.
I hope you enjoyed this DIY tutorial for DIY Drink Covers! Stay tuned for more DIYs coming soon! -Madi from DIY With Madi
Comments
Post a Comment
Please:
NO swearing
NO rude comments
NO offensive statements
NO disturbing comments